Getting Started with Gatsby, Fast and Slow
21 July 201913 min readIf Gatsby is new to you, check out my previous post, Why My Blog Is Built with Gatsby, where I explain what Gatsby is, how it works and the thinking behind why I chose to use it to build my site.
Over the past weeks, I've been building my personal site to play with Gatsby playing with Gatsby to build my personal site. It's been painless so far. But as with any personal project, one of the challenges is really taking the first step. Fortunately, for Gatsby, the first step of getting a website up and running takes only a matter of seconds.
Up and running in seconds
Provided that you have Git and npm already installed, getting a site running with Gatsby is as fast as running these:
npm install -g gatsby-cligatsby new my-hello-world-site https://github.com/gatsbyjs/gatsby-starter-hello-worldcd my-hello-world-starter/
gatsby develop
First, we install gatsby-cli globally. This makes the gatsby command line tool available for use throughout the different steps in the development process. These include pulling boilerplate code, starting a development server, building the website, or deploying to a web host.
Next, using the freshly-installed gatsby command, we create a new Gatsby project in a directory called my-hello-world-site. The project will be cloned from a starter called gatsby-starter-hello-world.
"What's a starter?" you might ask. They are just Git projects created and maintained by the community to help people jump-start their development quickly. They already contain an initial working code for a website that you can further tweak to your liking. There are starters for all sorts of purposes, such as blogs, portfolios, docs and eCommerce. If you plan on making a specific website, chances are there are already starters for your use case in the Starter Library.
In our example, we are using the official gatsby-starter-hello-world, which is the most bare-bones starter I can find. It just shows Hello world! on a plain white index page. This is a good boilerplate to build on top of if you want to understand the nitty-gritty.
The last step is to run gatsby develop inside the root directory of my-hello-world-site project we just created. This starts a 'development' version of the website, on http://localhost:8000/ by default. You can then open this URL in the browser to see changes reflected whenever you tweak the code.
With those easy steps, you are pretty much all set to start developing.
Adding pages
The most straightforward way to add pages is to create React components inside src/pages. At build time, Gatsby core automatically renders them into pages with the path based on the filename. For example, a component in src/pages/blog.js turns into a page in /blog.
Here's a sample React component.
import React from "react"

export default () => (
    <div>
        <h1>Welcome to my blog!</h1>        <p>The spectacle before us was indeed sublime.</p>    </div>
)
If you are not familiar with the syntax, this is just JavaScript at its core. It uses an arrow function that returns a React element in JSX syntax.
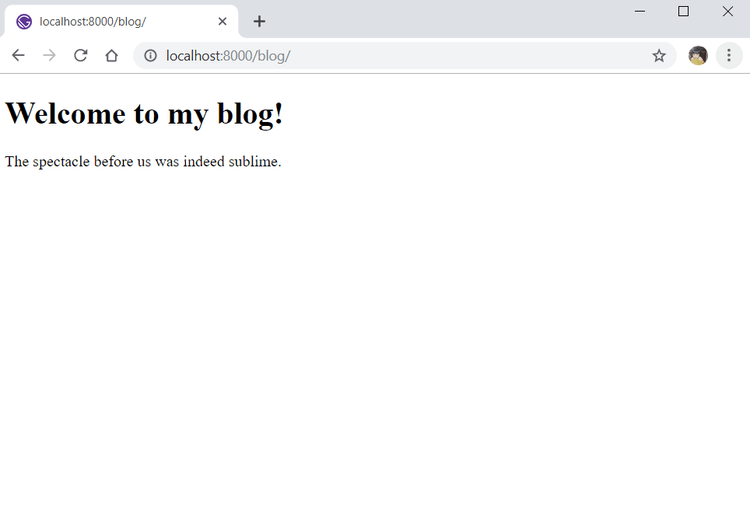
Copy the code to src/pages/blog.js. Then, if you haven't yet, run gatsby develop. You'll see in http://localhost:8000/blog the rendered version of the React component.
Creating pages from a data source
Often, you would need to create pages from a source programmatically.
For example, you have thousands of Markdown files and each will be generated as a page. You somehow need to read the data from the files and convert them to HTML so that they can be rendered as pages. You would also prefer using a single template and just use that to create all the pages.
The previous approach would no longer cut it. Typically, this is the recipe you need to follow:
- Pull data from a source
- Transform data to a usable form, if necessary
- Create the pages by plugging in queried data to a template
Pulling data from Markdown files
When the contents of your pages need to be fetched from some source, you'll most likely need a source plugin. If you need to fetch from the Wordpress API, there's a Wordpress source plugin. If you need to pull data from a MongoDB collection, there's a MongoDB source plugin. You can search the Gatsby Plugin Library for the plugin that will do the job. Just search gatsby-source-, as this is the convention for naming source plugins.
For our Markdown files, gatsby-source-filesystem is the one. It just pulls data from the local filesystem. Let's play with it.
First step is to install it.
npm install gatsby-source-filesystemNext, you have to declare your intent to use it by adding it as a plugin in gatsby-config.js. In the code below, we are also instructing the plugin to read files inside content/blog directory.
module.exports = {
  plugins: [
    {      resolve: `gatsby-source-filesystem`,      options: {        name: `src`,        path: `${__dirname}/content/blog`,      },    },  ],
}
Of course, we have to create content/blog directory. We'll put Markdown files there later.
Run gatsby develop to initiate the bootstrapping sequence. Part of what happens in this process are, in order:
- Gatsby loads plugins listed in
gatsby-config.js - Loaded source plugins are invoked to pull data into GraphQL
GraphQL manages the data for Gatsby. It normalizes data pulled from different sources so that we can query them in a standard expressive manner before we supply them to our pages. Note that it only exists at build-time, not when the site is already live.
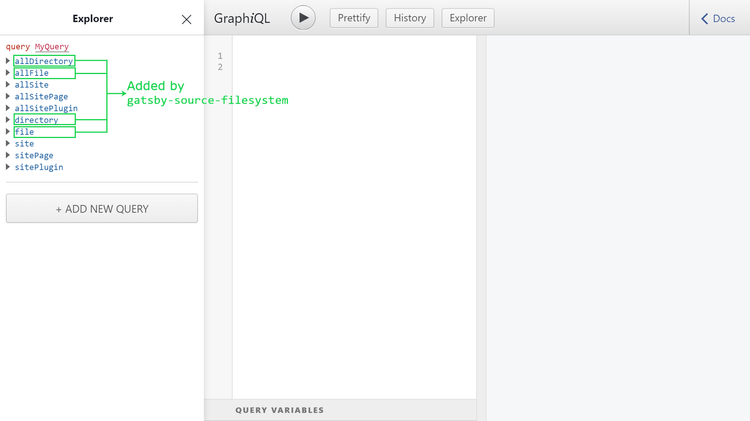
After gatsby develop is done, open http://localhost:8000/___graphql. This is the link to GraphiQL, the in-browser GraphQL IDE, where we can explore available data and run queries.
In the Explorer section on the left side are the available schemas that can be queried. The schemas highlighted in green are those created by gatsby-source-filesystem.
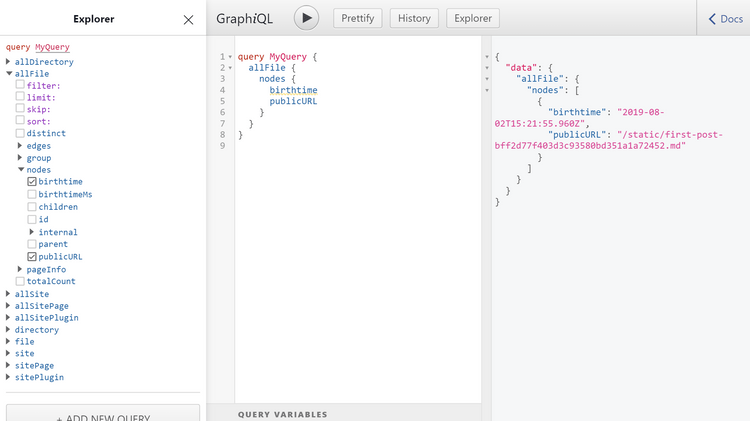
You can use Explorer to view schemas, and the properties that can be queried. In this example, we are querying for the birthTime and publicURL of all the file nodes gathered by gatsby-source-filesystem, which it stores in allFile schema.
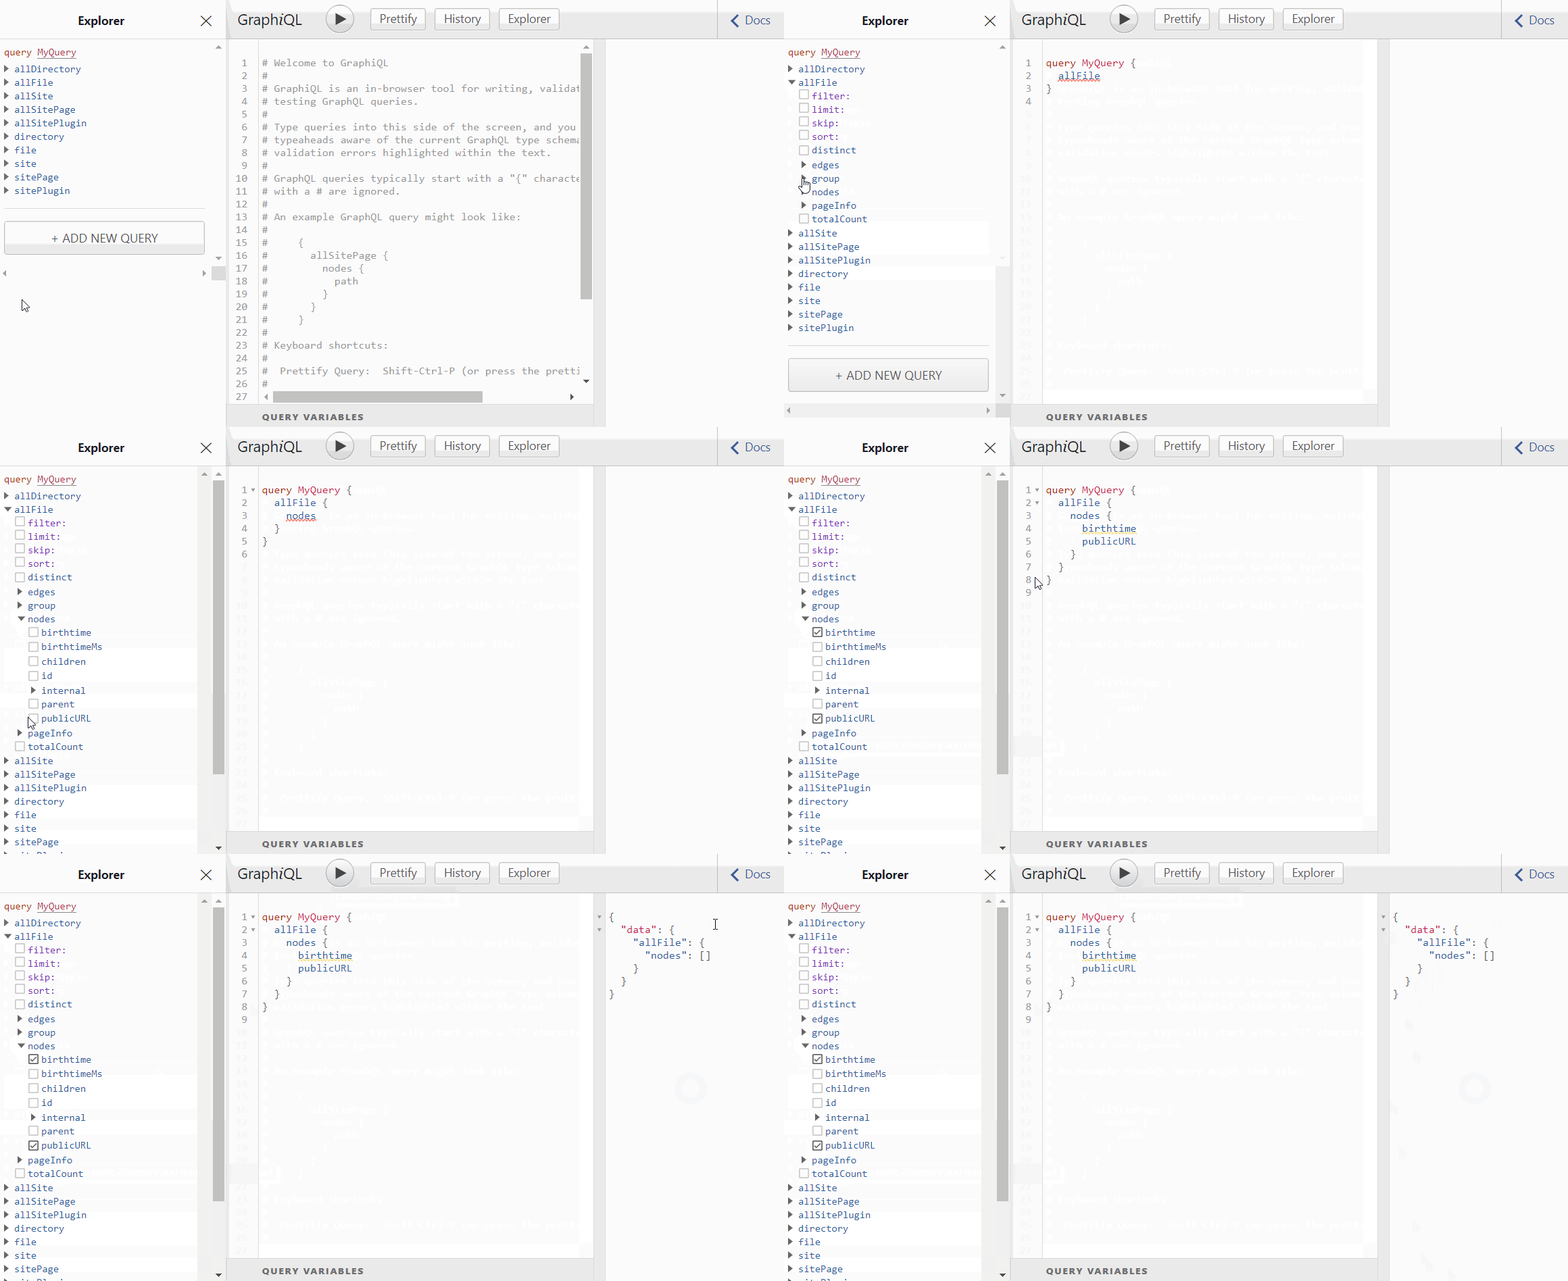
As you click the properties in Explorer, the query is already being formed. You just have to hit the 'Play' ▶️ button to execute the query.
As expected, the list of file nodes are empty. This is because content/blog has no files yet. It's the directory where gatsby-source-filesystem is looking, because we declared so in gatsby-config.js.
Let's add a Markdown file in content/blog and name it first-post.md.
---
title: My First Post
slug: my-first-post
date: 02 August 2019
excerpt: Hi. I'm new to this blogging thing.
---

Hi. I'm new to this blogging thing.

But did you know that _blog_ is short for _weblog_?
Running the previous query in GraphiQL would now yield a result containing data about first-post.md.
Transforming Markdown to HTML
Markdown is the preferred format for documentation in the software world these days. I personally love it because its simple, lightweight, and it allows a more focused writing experience.
To create webpages, however, you need to convert Markdown to HTML first. For example:
# Hellois converted to<h1>Hello</h1>[click me](https://example.com)becomes<a href='https://example.com'>click me</a>
With Gatsby, in such cases when you need to modify raw data brought by source plugins into a more workable form, you need to use transformer plugins. You can find a transformer plugin in the Plugin Library or write your own.
For Markdown, you can use gatsby-transformer-remark. It uses the Remark Markdown parser. As with any Gatsby plugin, you need to install it first.
npm install gatsby-transformer-remarkThen, add it as a plugin in gatsby-config.js:
module.exports = {
  plugins: [
    {
      resolve: `gatsby-source-filesystem`,
      options: {
        name: `src`,
        path: `${__dirname}/content/blog`,
      },
    },
    `gatsby-transformer-remark`,  ],
}
During bootstrapping, gatsby-transformer-remark processeses Markdown nodes (i.e. data objects) that are loaded into the Gatsby data system by source plugins.
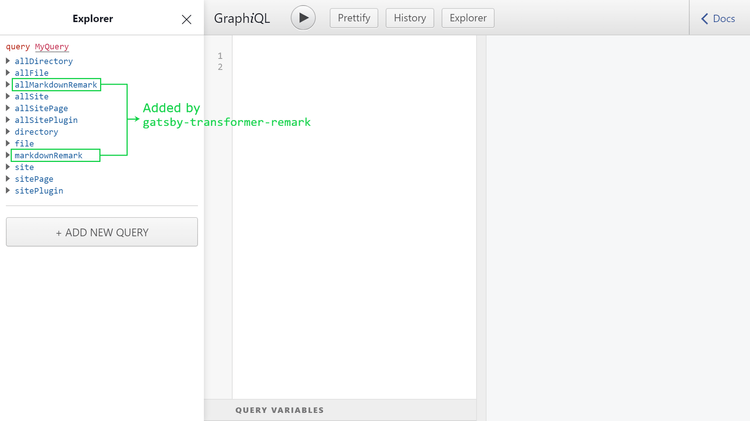
Trigger this sequence again by running gatsby develop. You'll notice in GraphiQL that there are two newly-added schemas. Both hold processed Markdown data, all in the perfect format we need to create pages.
I'm talking not just about the converted HTML content, but also some other nice stuff. If you notice, in first-post.md, there is some structured information at the beginning.
---
title: My First Post
slug: my-first-post
date: 02 August 2019
excerpt: Hi. I'm new to this blogging thing.
---
This is called frontmatter, a section that contain useful metadata describing that file. You can put arbitrary properties there as you wish. In this example, we added title, slug, date and excerpt information, because I think we will need it when we create the page.
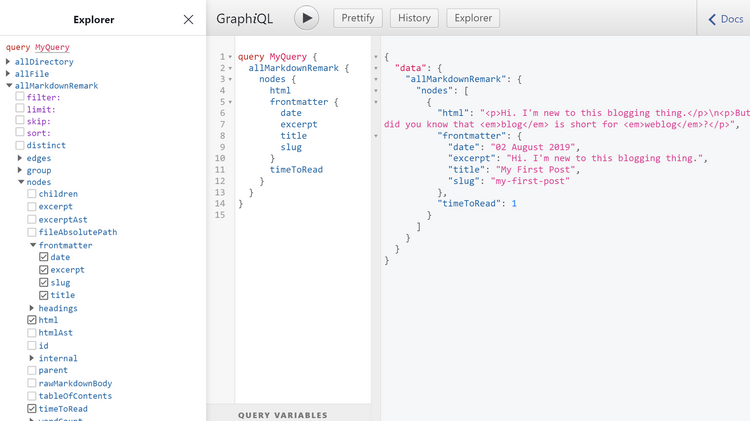
This frontmatter is already parsed and made available for query by gatsby-transformer-remark. It also adds other cool bits like timeToRead, an estimate on how long it will take to read the post, Medium-style. Here's a sample query, where we get selected properties of each of the Markdown files processed by the transformer using the allMarkdownRemark schema.
At this point, you already have the data you need. It's just a matter of instructing Gatsby to create the pages.
Creating pages using queried data
Gatsby initiates a specific sequence of steps during its lifecycle. It offers lifecycle APIs so that you can hook your own operations into this sequence.
On bootstrap and after sourcing and transformation of data, there is a part where Gatsby checks for an implementation of createPages in gatsby-node.js. If it finds one, it calls it. We'll use this hook to create our pages programmatically.
Create a file called gatsby-node.js in the root of the project. Inside it, export a createPages function that accepts an object containing graphql and actions. These two parameters are utilities passed on by Gatsby when it calls the createPages implementation.
exports.createPages = ({ graphql, actions }) => {
  // Do something
}
Next, we have to query for all the posts using the graphql function passed by Gatsby. Let's get the slug property of each post, since we need something that will identify each one uniquely. graphql returns a promise that, when fulfilled, passes along the result of the query. Let's log the result in the console.
exports.createPages = ({ graphql, actions }) => {
  return graphql(`
    query {
      allMarkdownRemark {
        edges {
          node {
            frontmatter {
              slug
            }
          }
        }
      }
    }
  `).then(result => {
    if (result.errors) {
      throw result.errors
    }

    console.log(JSON.stringify(result, null, 2))  })
}
When you execute gatsby develop, you should see the result logged:
{
  "data": {
    "allMarkdownRemark": {
      "edges": [
        {
          "node": {
            "frontmatter": {
              "slug": "my-first-post"
            }
          }
        }
      ]
    }
  }
}
The edges array contains the individual posts. By iterating over the each node in this array through Array.map, we can get the slug value and work on each post.
exports.createPages = ({ graphql, actions }) => {
  return graphql(`
    query {
      allMarkdownRemark {
        edges {
          node {
            frontmatter {
              slug
            }
          }
        }
      }
    }
  `).then(result => {
    if (result.errors) {
      throw result.errors
    }

    result.data.allMarkdownRemark.edges.map(({ node }) => {      const slug = node.frontmatter.slug    })  })
}
Apart from the slug, we also need to create a page template. When creating a page programmatically, Gatsby needs a React component that will define the structure of the page, given some context data.
Create a new directory named src/templates. Then, add this in a file called src/templates/blog-post.js:
import React from "react"

export default () => {
  return (
    <div>
      <div>Hi! This is a blog post.</div>
    </div>
  )
}
Now that we have the stuff ready, let's create a page for each post. This is done using one of the actions provided by Gatsby to our createPages function. The actions object is actually a collection of functions that we can use to change state on our site. The specific function we need is createPage. We can extract it by destructuring the object.
exports.createPages = ({ graphql, actions }) => {
  const { createPage } = actions
  return graphql(`
    query {
      allMarkdownRemark {
        edges {
          node {
            frontmatter {
              slug
            }
          }
        }
      }
    }
  `).then(result => {
    if (result.errors) {
      throw result.errors
    }

    result.data.allMarkdownRemark.edges.map(({ node }) => {
      const slug = node.frontmatter.slug
    })
  })
}
When calling createPage, you need to specify the path for the page, the component page template and some context data for the page. The path should start with a forward slash. The component should be an absolute path, so we'll use the Node.js Path module to resolve it. context is where you put data that identifies or tells something about the page. It will be used as GraphQL variables in page queries. For this, we are putting slug since it distinguishes one post from another.
const path = require(`path`)
exports.createPages = ({graphql, actions}) => {
  const { createPage } = actions

  return graphql(`
    query {
      allMarkdownRemark {
        edges {
          node {
            frontmatter {
              slug
            }
          }
        }
      }
    }
  `).then(result => {
    if (result.errors) {
      throw result.errors
    }

    result.data.allMarkdownRemark.edges.map(({ node }) => {
      const slug = node.frontmatter.slug
      createPage({        path: `/${slug}`,        component: path.resolve('./src/templates/blog-post.js'),        context: {          slug: `${slug}`,        },      })    })
  })
}
Now, it's time to tweak the template, blog-post.js. First, we need to specify the page query.
On bootstrap, Gatsby extracts page queries from the query property exported by the component. You need to use the graphql tag function and specify the query in-between the backticks. Gatsby runs this query, and passes the result to the render function as the data property.
import React from "react"
import { graphql } from "gatsby"
export const query = graphql`  query($slug: String!) {    markdownRemark(frontmatter: {slug: {eq: $slug}}) {      timeToRead      html      frontmatter {        date        excerpt        title      }    }  }
`export default ({ data }) => {
  console.log(data)
  return (
    <div>
      <div>Hi! This is a blog post.</div>
    </div>
  )
}
Inside the render function is where you define the structure of the page using the data passed. In this example, we display the title as a header, show the date and timeToRead as subheader and the html as paragraph.
import React from "react"
import { graphql } from "gatsby"

export const query = graphql`
  query($slug: String!) {
    markdownRemark(frontmatter: {slug: {eq: $slug}}) {
      timeToRead
      html
      frontmatter {
        date
        excerpt
        title
      }
    }
  }
`

export default ({ data }) => {
  const post = data.markdownRemark  return (    <div>      <h1>{ post.frontmatter.title }</h1>      <h5>{ post.frontmatter.date } | { post.timeToRead }-minute read</h5>      <p dangerouslySetInnerHTML={{ __html: post.html }}></p>    </div>  )}
Finally, you can now see our programmatically created page in /my-first-post.
Let's add another Markdown in content/blog called sorrows-of-young-werther.md.
---
title: The Sorrows of Young Werther
slug: sorrows-of-young-werther
date: 19 August 2019
excerpt: This content was generated by blindtextgenerator.com
---

A wonderful serenity has taken possession of my entire soul, like these sweet mornings of spring which I enjoy with my whole heart. I am alone, and feel the charm of existence in this spot, which was created for the bliss of souls like mine.
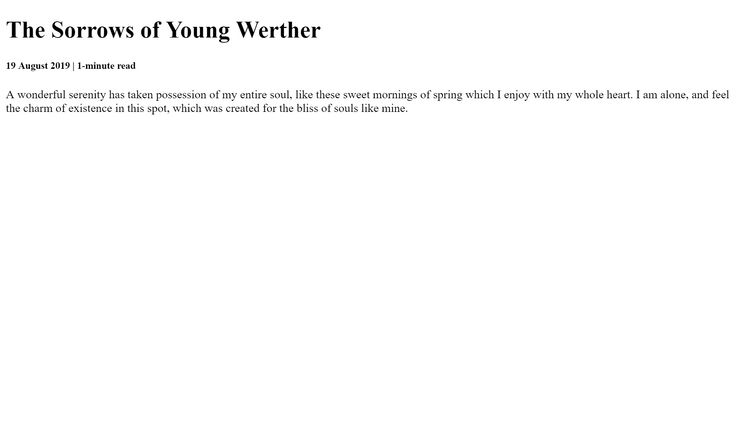
Since we already did all the dirty work, we can instantly see this Markdown rendered as a page in /sorrows-of-young-werther.
From here on, you can add more Markdown posts in content/blog. They will be rendered automatically without needing to add any code. In case you want to change the layout or design of your posts, you can simply tweak the page template.

